Recognize your handwritten numbers
Creation date: 2016-03-02
In the last blog entry you learned how to digitize a single handwritten digit. The downsides were that you have to capture a single digit and the image should be quadratic.
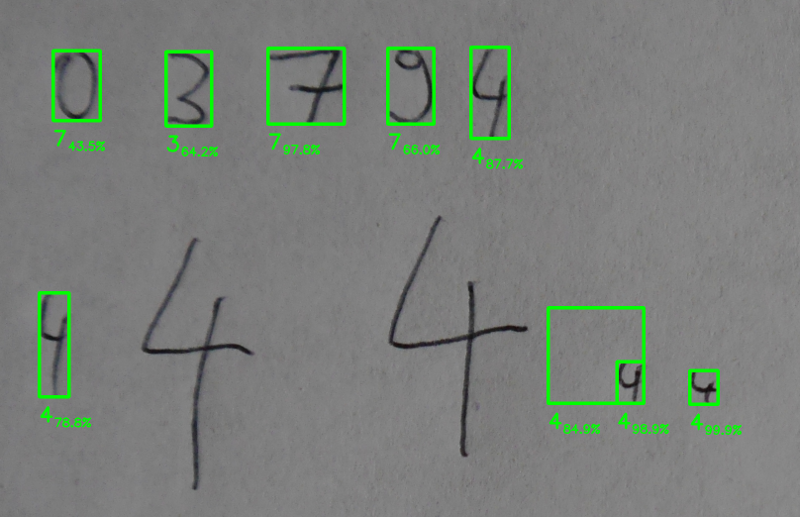
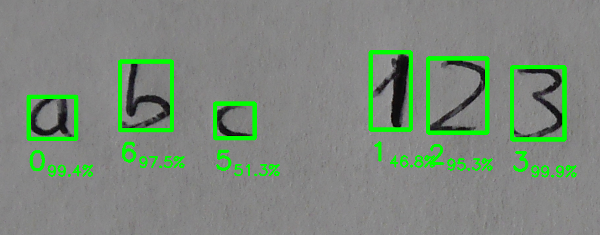
But that's not the case. Now it's time to make a step further. In this entry you will learn how to "find" digits on a sheet of paper and recognize them.
I don't wanna lie: At the moment in only works if the sheet is blank and you write with a good contrast. And unfortunately there should be nothing else on the paper. If there are some other dark "points" they will be recognized as digits as well. MNIST has no images for non digit images so there are no counter examples for our neural net.
But let's start with our code: Make sure that you have read my previous blog entry about recognizing digits.
At the beginning I would like to save the current instance of our trained model. There is no need to train the model everytime we call the programm.
Therefor you have to replace these lines
# initialize all variables
init = tf.initialize_all_variables()

# create a session
sess = tf.Session()
sess.run(init)
with these:
# we will use image+".png"
image = sys.argv[1]
train = False if len(sys.argv) == 2 else sys.argv[2]
checkpoint_dir = "cps/"

saver = tf.train.Saver()
sess = tf.Session()
# initialize all variables and run init
sess.run(tf.initialize_all_variables())
Here the folder cps/ should exist in you root folder ("cps" = our checkpoints folder)
The first line checks if we want to train the model. If you want to you have to start the program with:
python2 step2.py IMAGE_NAME TrueThe next step is to check whether we want to train or use the checkpoint:
if train:
    # create a MNIST_data folder with the MNIST dataset if necessary
    mnist = input_data.read_data_sets("MNIST_data/", one_hot=True)

    # use 1000 batches with a size of 100 each to train our net
    for i in range(1000):
        batch_xs, batch_ys = mnist.train.next_batch(100)
        # run the train_step function with the given image values (x) and the real output (y_)
        sess.run(train_step, feed_dict={x: batch_xs, y_: batch_ys})
    saver.save(sess, checkpoint_dir+'model.ckpt')

    correct_prediction = tf.equal(tf.argmax(y,1), tf.argmax(y_,1))
    accuracy = tf.reduce_mean(tf.cast(correct_prediction, "float"))
    print sess.run(accuracy, feed_dict={x: mnist.test.images, y_: mnist.test.labels})
else:
    # Here's where you're restoring the variables w and b.
    # Note that the graph is exactly as it was when the variables were
    # saved in a prior training run.
    ckpt = tf.train.get_checkpoint_state(checkpoint_dir)
    if ckpt and ckpt.model_checkpoint_path:
        saver.restore(sess, ckpt.model_checkpoint_path)
    else:
        print 'No checkpoint found'
        exit(1)
In the if branch we only added the line
saver.save(sess, checkpoint_dir+'model.ckpt')The else branch restores the checkpoint.
The overall approach is that we want to read an image which contains our handwritten digits. Then we need two versions of this image an unchanged original and a black and white one, which we can analyse in some steps.
# read original image
color_complete = cv2.imread("img/blog/" + image + ".png")

# read the bw image
gray_complete = cv2.imread("img/blog/" + image + ".png", cv2.CV_LOAD_IMAGE_GRAYSCALE)

# better black and white version
(thresh, gray_complete) = cv2.threshold(255-gray_complete, 128, 255, cv2.THRESH_BINARY | cv2.THRESH_OTSU)
cv2.imwrite("pro-img/compl.png", gray_complete)

digit_image = -np.ones(gray_complete.shape)
Here we read the original first, which we need to display our green rectangles and show our prediction. Then we do the steps which we have done in the previous blog entry.
The last line creates a matrix which has the size of our image and fills it with -1. Inside this array we will save at which place we already found a digit so it isn't possible to recognize the same digit twice. That speeds up the process and stops the algorithm to create a mess of digits.


To find the digits inside our big image we will crop it in a lot of different ways. If there is only a single digit inside our cropped part we can find the smallest rectangle around that digit easily.
I'm sorry for the following nested structure of four for loops.
height, width = gray_complete.shape

"""
crop into several images
"""
for cropped_width in range(100, 300, 20):
    for cropped_height in range(100, 300, 20):
        for shift_x in range(0, width-cropped_width, cropped_width/4):
            for shift_y in range(0, height-cropped_height, cropped_height/4):
Here we define the smallest and the largest width and height of a single digit (cropped_width and cropped_height). Then we have to shift the rectangle using the shift_x and the shift_y for loop.
All of the following code will be inside this nested loops.
Our cropped image called gray:
gray = gray_complete[shift_y:shift_y+cropped_height,shift_x:shift_x + cropped_width]If the cropped image is almost empty (blank) we can move to the next one:
if np.count_nonzero(gray) <= 20:
    continue
And if we cut through a digit somewhere, which means that there is no white border, we can continue as well:
if (np.sum(gray[0]) != 0) or (np.sum(gray[:,0]) != 0) or (np.sum(gray[-1]) != 0) or (np.sum(gray[:,-1]) != 0):
    continue
We want to save the top left and the bottom right position of our rectangle to show the rectangle at the end.
top_left = np.array([shift_y, shift_x])
bottom_right = np.array([shift_y+cropped_height, shift_x + cropped_width])
Now we can find the smallest rectangle in the same way as we did last time.
while np.sum(gray[0]) == 0:
    top_left[0] += 1
    gray = gray[1:]

while np.sum(gray[:,0]) == 0:
    top_left[1] += 1
    gray = np.delete(gray,0,1)

while np.sum(gray[-1]) == 0:
    bottom_right[0] -= 1
    gray = gray[:-1]

while np.sum(gray[:,-1]) == 0:
    bottom_right[1] -= 1
    gray = np.delete(gray,-1,1)
but we need to change our top left and bottom right points inside the loops.
Now we can check if there is already a digit inside the current rectangle using our digit_image array.
actual_w_h = bottom_right-top_left
if (np.count_nonzero(digit_image[top_left[0]:bottom_right[0],top_left[1]:bottom_right[1]]+1) >
            0.2*actual_w_h[0]*actual_w_h[1]):
    continue
What are we doing exactly?
At first we get the rectangle inside our digit_image using:
digit_image[top_left[0]:bottom_right[0],top_left[1]:bottom_right[1]]but in the initialized step everything is filled with -1 which obviously is nonzero. Therefor we add +1 before we count the number of nonzero values. If this number is bigger than 20% of the actual image we would say that the space is used already and maybe we found exactly that digit already.
The following is preprocessing the single digit like last time. We need to resize it into a 28x28 image but we want to keep the ratio, so we add some black lines, keep in mind, that the image is inverted at the moment, at the top,bottom or left and right.
rows,cols = gray.shape
compl_dif = abs(rows-cols)
half_Sm = compl_dif/2
half_Big = half_Sm if half_Sm*2 == compl_dif else half_Sm+1
if rows > cols:
    gray = np.lib.pad(gray,((0,0),(half_Sm,half_Big)),'constant')
else:
    gray = np.lib.pad(gray,((half_Sm,half_Big),(0,0)),'constant')
Here we need a smaller and a bigger half to have a quadratic image at the end.
And then we resize it to our 20x20 inner bounding box, add the black lines to get a 28x28 image and shift it using the center of mass.
gray = cv2.resize(gray, (20, 20))
gray = np.lib.pad(gray,((4,4),(4,4)),'constant')


shiftx,shifty = getBestShift(gray)
shifted = shift(gray,shiftx,shifty)
gray = shifted
To get our prediction we have to flatten the image and use values between 0 and 1.
flatten = gray.flatten() / 255.0To get our prediction we need the following tensorflow lines:
prediction = [tf.reduce_max(y),tf.argmax(y,1)[0]]
pred = sess.run(prediction, feed_dict={x: [flatten]})
print pred
The first value inside pred is the probability that the second value which represents our prediction is correct. Well the probability is meassured by our algorithm and is probably not that reliable.
At the top of our nested lopps we used our digit_image array, now it's time to fill it with some value, because we now found a digit:
digit_image[top_left[0]:bottom_right[0],top_left[1]:bottom_right[1]] = pred[1]Okay actually not a digit but just some points on a white paper but we think, that it is a digit.
Let's add our green border and our prediction to our original image:
cv2.rectangle(color_complete,tuple(top_left[::-1]),tuple(bottom_right[::-1]),color=(0,255,0),thickness=5)

font = cv2.FONT_HERSHEY_SIMPLEX
# digit we predicted
cv2.putText(color_complete,str(pred[1]),(top_left[1],bottom_right[0]+50),
            font,fontScale=1.4,color=(0,255,0),thickness=4)
# percentage
cv2.putText(color_complete,format(pred[0]*100,".1f")+"%",(top_left[1]+30,bottom_right[0]+60),
            font,fontScale=0.8,color=(0,255,0),thickness=2)
After the loops we now want to save our image:
cv2.imwrite("pro-img/digitized_image.png", color_complete)
What's next?
How good is our approach? First of all it's pretty simple. We can't work with all sizes of digits because our cropped width are defined inside the code.

But if that's no problem a big one is, that the blank sheet of paper should only contain numbers.

To avoid this we would need a different neural net which can tell us, if the cropped part of an image contains a number or not. Something like counter examples for MNIST. Then we can add them to our training examples and add another value 11 which represents not a digit (short NaD :D). If our prediction has his maximum value on that eleventh value we can ignore it.
You can download all the code on my OpenSourcES GitHub repo.
New entry on MNIST Improve using your own handwritten digits
If you enjoy the blog in general please consider a donation via Patreon. You can read my posts earlier than everyone else and keep this blog running.
Want to be updated? Consider subscribing on Patreon for free


