Hang your code on the wall
Creation date: 2019-03-27

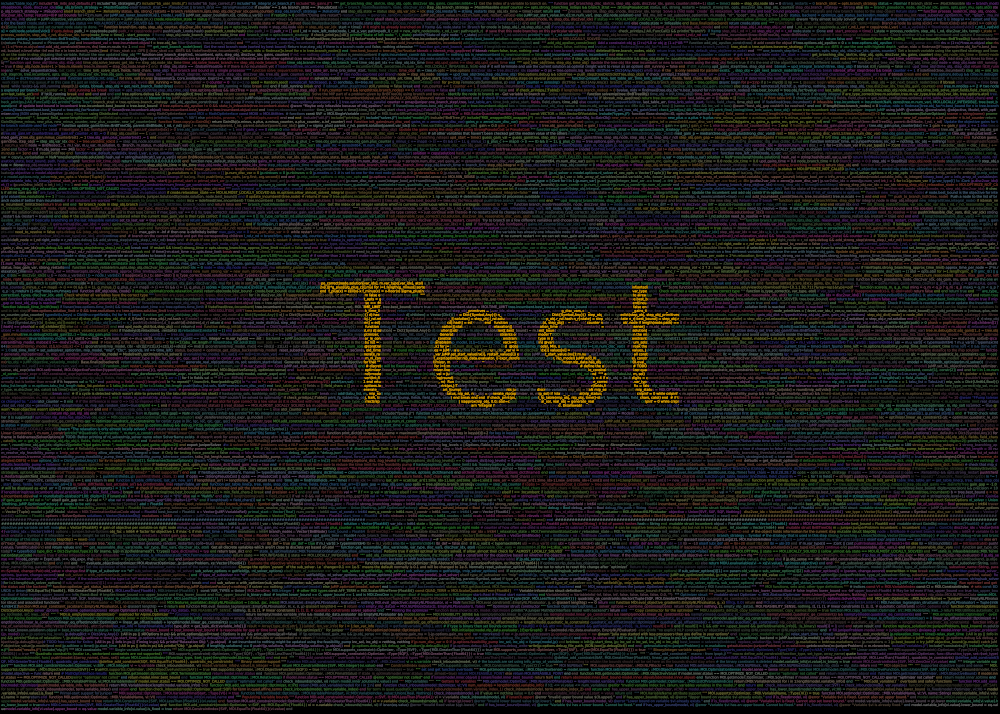
Several years ago I found commits.io which is a service for making a poster out of your GitHub code project. I found this a really nice idea but at that time I didn't have a project big enough to fill a poster. Now programming Juniper.jl I have enough but I think on their website you don't have enough options to play with your poster. Can I make the background black? What color does the code have? And why do I have to pay so much for it?
A few days ago I decided to build this kind for myself and make it open to the public of course. You can't use it as easily on a website and order it directly but I think for people reading my blog it's easy to set it up and maybe you can print the poster in your university or at a local service to save some money.
Okay for everyone who just wants to see the project and play with it: CodePoster on GitHub.
For the coders in you who want to know how to build something like that with Julia and maybe want to contribute:
There are several steps:
Have your code lines on the canvas
Put text on top of it
Make it easily useable and customizable
Code on canvas
First we have to read the project folder and extract the code lines: Reading wise you basically need this code:
for (root, dirs, files) in walkdir(folder)
    if !occursin(ignore,root)
        for file in files
            if occursin(ext_pattern, extension(file))
                open(root*"/"*file) do file
                    for ln in eachline(file)
                        # do something
                    end
                end
            end
        end
    end
end
which recursively reads all files in your specified folder and then checks whether the file should be ignored for example the .git folder is probably nothing you want to have on your poster. Additionally the user should specify the ext_pattern. For example making it possible to include or exclude the markdown files like README.md.
For the actual drawing part I use Luxor.jl. In front of our reading loop we need to specify the Canvas with:
Drawing(size_x, size_y, "code.png")
origin(Point(fsize,fsize))
background("black")
fontsize(fsize)

##################
# draw something #
##################

finish() # saves the file
later we check how the size of the canvas is specified by the user and talk more about the font size. The origin function defines where we want to place the next text where basically the lower left corner of a char is the origin. (i.e g has the origin higher than their lowest point as the lower part of g is under the normal text line.)
For each line in our code we want to remove the whitespaces at the beginning and end as well as removing whitespaces from things like:
time_limit :: Float64which can be achieved by:
# there should be a whitespace between two lines
stripped = strip(ln)*" "
stripped = replace(stripped, r"\s+" => " ")
In order to place the next line at the correct position we need to get the size of our text which can be done with:
size_ln = textextents(stripped)the function is well explained in the docs of Luxor.jl
which gives us the width and height as well as the origin of a next character which I used:
xadv_ln = size_ln[5]
yadv_ln = size_ln[6]
Then we set the fontcolor with
sethue(rand_between(rand_color[:r]),
       rand_between(rand_color[:g]),
       rand_between(rand_color[:b]))
where I explain rand_color and rand_between in the last section. For now you could replace it with sethue(RGB(rand(10:20)/20,rand(10:20)/20,rand(10:20)/20))
then we define the origin of the next block again by using xadv_ln to have something like
origin(Point(last_x,last_y))
text(stripped)
last_x += xadv_ln
of course we have to get to the next line at the end of the canvas to warp the text but I think that is relative straight forward once you understand the syntax of Luxor.jl. One thing I want to point out is when indexing a string in Julia for example to split a text this is too long for the current line into two parts you shouldn't use text[1:i] and increase i incrementally to check whether it still fits to the current line as this might happen:
julia> t = "a ∈ B"
julia> t[1:2]
"a "
julia> t[1:1]
"a"
julia> t[1:2]
"a "
julia> t[1:3]
"a ∈"
julia> t[1:4]
ERROR: StringIndexError("a ∈ B", 4)
which is a bit unexpected. Instead you have to get the next index by using nextind(str,idx) like
julia> t[1:nextind(3)]works.
I think that is everything you need for now. Please feel free to have a look at the code and ask questions if something is unclear or a stupid way of doing it ;)
Text on top
Now the question is how to add the text on top. There are three different ways of doing it.
Just add a text with a bigger fontsize in the middle
Only colorize pixels if there is code underneath
Same as #2 but make sure that only complete chars are colorized
I thinks #1 is pretty boring. #2 is not too bad but doesn't look that nice if you zoom in or in real life terms: Are close to the poster.
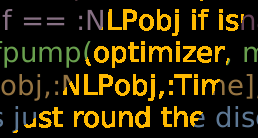
The #3 version looks like this
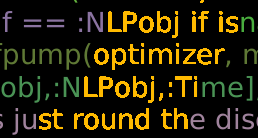
which in my opinion is better. I think there are some improvements possible as the edges don't look as good as before because I always use the same color.
Anyway lets first create the center text:
Drawing(size_x, size_y, "text.png")
fontsize(font_size_center_text)
wtext, htext = textextents(center_text)[3:4]
xbtext, ybtext = textextents("a")[1:2]
background("black")
sethue(center_color)
text(center_text, (size_x-wtext)/2, (size_y-htext)/2+htext/2-ybtext/2)
finish()
which is pretty simple apart from putting the text in the center but I think my text is better centered then using the function textcentered. Even though I don't really know how a centered text is defined like having the bounding box in the center which works for text like aaaa but looks weird for Gaga. My approach is to use the bounding box to set the x value and for y use the middle of an a as the center of the image.
Then we have to load the image after the drawing is done to get a matrix representation of the pixels with:
text_img = load("text.png")
code_img = load("code.png")
now for #2 we would do:
size_y, size_x = size(text_img)
for y in 1:size_y, x in 1:size_x
    if text_img[y,x] != RGB(0,0,0) && code_img[y,x] != RGB(0,0,0)
        code_img[y,x] = center_color
    end
end
if we use a black (RGB(0,0,0)) background (this is currently the only option but is easy to extend)
So we check pixel by pixel in the text image whether it is background or part of the center text as well as for the code image. If both are part of the text then choose the color for the center text.
The more advanced version I implemented includes a floodfill algorithm which is basically what every photo editing or drawing software includes: The color bucket.
Then the code from above looks like this:
last_check_params = Dict{Symbol,Any}()
last_check_params[:img] = text_img
last_check_params[:outside_color] = RGB(0,0,0)
last_check_params[:more_than] = 0.75 # 75%

for y in 1:size_y, x in 1:size_x
    if text_img[y,x] != RGB(0,0,0)
        if !isapprox(code_img[y,x],RGB(0,0,0); atol=0.05)
            && !isapprox(code_img[y,x],center_color; atol=0.05)
            yx = CartesianIndex(y,x)
            code_img = floodfill!(code_img, yx, RGB(0,0,0),
                        center_color;
                        last_check=more_than,
                        last_check_params=last_check_params)
        end
    end
end
Which basically fills a whole character using the color bucket method and then checks whether more than 75% of the new filled area should actually be filled. If not don't fill the char. My algorithm is a little different than the normal floodfill algorithm as it uses a color (here black) which shouldn't be filled instead of a colored area which should be filled. I did this because if you use the text command in Luxor.jl the chars are not completely drawn with the given fontcolor due to some aliasing/Font rasterization techniques. I didn't build in aliasing into my part but wanted to handle the aliasing Luxor.jl is using by filling all pixels which are part of the char even if not the full color (pixels on the edge of a char).
The code for floodfill itself is not that interesting in my opinion the general idea is to go in one direction (left and right) check the pixel as well as the pixels on top/below if they are not black then put it into a queue and change the color.
I use isapprox(color1,color2; atol=0.05) everywhere to not fill something which is nearly black (can't really see the difference between it and black).
Customizable
At this point it works quite nice for my own purposes by checking different font sizes and change something hard in the code like the color of the code lines.
I want that other people can use it as well without to understand the code. For this purposes the first step was to use ArgParse.jl so that you can call the program with command line arguments i.e like ./poster.jl -f /Users/olek/Code/Juniper --ext "(\.jl)" -t Juniper.jl
Then you can specify the arguments like this:
function parse_commandline()
    s = ArgParseSettings()

    @add_arg_table s begin
        "--folder", "-f"
            help = "The code folder"
            required = true
        "--fsize"
            help = "The font size for the code. Will be determined automatically if not specified"
            arg_type = Float64
            default = -1.0
    end

    return parse_args(s)
end
and later call args = parse_commandline() to get a dictionary. The user can see all different options by calling ./poster.jl --help
$ ./poster.jl --help
usage: poster.jl -f FOLDER [--fsize FSIZE] [--ext EXT]
                 [--ignore IGNORE] [-t CENTER_TEXT]
                 [--fsize_text FSIZE_TEXT] [-c CENTER_COLOR]
                 [--code_color_range CODE_COLOR_RANGE] [--width WIDTH]
                 [--height HEIGHT] [--dpi DPI] [--start_x START_X]
                 [--start_y START_Y] [--line_margin LINE_MARGIN] [-h]

optional arguments:
  -f, --folder FOLDER   The code folder
  --fsize FSIZE         The font size for the code. Will be determined
                        automatically if not specified (type: Float64,
                        default: -1.0)
  --ext EXT             File extensions of the code seperate by , i.e
                        jl,js,py (type: Regex, default:
                        r"(\.jl|\.py|\.js|\.php)")
  --ignore IGNORE       Ignore all paths of the following form. Form
                        as in --ext (type: Regex, default:
                        r"(\/\.git|test|Ideas|docs)")
  -t, --center_text CENTER_TEXT
                        The text which gets displayed in the center of
                        your poster (default: "Test")
  --center_fsize CENTER_FSIZE
                        The font size for the center text. (type:
                        Float64, default: 1400.0)
  -c, --center_color CENTER_COLOR
                        The color of center_text specify as r,g,b
                        (type: RGB, default:
                        RGB{Float64}(1.0,0.73,0.0))
  --code_color_range CODE_COLOR_RANGE
                        Range for the random color of each code line
                        i.e 0.2-0.5                      for a color
                        between RGB(0.2,0.2,0.2) and RGB(0.5,0.5,0.5)
                        or 0.1-0.3,0.2-0.5,0-1 to specify a range for
                        r,g and b (default: "0.2-0.5")
  --width WIDTH         Width of the poster in cm (type: Float64,
                        default: 70.0)
  --height HEIGHT       Width of the poster in cm (type: Float64,
                        default: 50.0)
  --dpi DPI             DPI (type: Float64, default: 300.0)
  --start_x START_X     Start value for x like a padding left and
                        right (type: Int64, default: 10)
  --start_y START_Y     Start value for y like a padding top and
                        "bottom" (type: Int64, default: 10)
  --line_margin LINE_MARGIN
                        Margin between two lines (type: Int64,
                        default: 5)
  -h, --help            show this help message and exit
Now we can compute the size_x, size_y which we used before with the width,height and DPI.
For the Regex options like ext and ignore as well as for the RGB options it is not directly supported in ArgParse. You need to have your own parser function:
function ArgParse.parse_item(::Type{Regex}, x::AbstractString)
    return Regex(x)
end

function ArgParse.parse_item(::Type{RGB}, x::AbstractString)
    parts = parse.(Float64,split(x,","))
    return RGB(parts...)
end
The last part is now to determine the font size of the code. For this I read through all the code files and determine for some different font sizes how much of the poster it would fill and then choose the best one.
Now create your own poster! Checkout the GitHub repository
I'll keep you updated if there are any news on persistence on Twitter OpenSourcES as well as my more personal one: Twitter Wikunia_de
Thanks for reading!
If you enjoy the blog in general please consider a donation via Patreon There you will get the blog posts earlier and keep this blog running.
Want to be updated? Consider subscribing on Patreon for free
