Javis.jl examples series: Collatz Conjecture
Creation date: 2021-09-18

A quick blog post about another animation idea I had for a long time. Again inspired by others like Edmund Harris, Numberphile and The Coding Train.
In this post I want to walk through animations that can be done regarding the Collatz conjecture. It is more for visual appeal than to give any hints of solving the hard problem but maybe some of you has ideas on top of it that can be used to get a better feeling for the problem.
What is the Collatz conjecture?
Given this function:
\[ f(n)= \begin{cases}\frac{n}{2} & \text { if } n \equiv 0(\bmod 2) \\ 3 n+1 & \text { if } n \equiv 1(\bmod 2)\end{cases} \]the conjecture says that for every \(n\) you apply the function to in sequence the number will end up in a cycle 4,2,1. So you apply the above function \(f\) to the number \(n\) first and then apply it to the resulting number and so on.
You can easily see that for every power of two it will just go through the upper part of the equation and ends up at 1. Then \(3n+1 = 4\) and you end up in a loop 4,2,1. Now is this true for every number?
That is the big question.
Implementation of the sequence
Before we do any animation we might want to get just implement the function itself and we're probably interested in the sequence taken.
function collatz_next(n)
    if n % 2 == 0
        return n ÷ 2
    else
        return 3n+1
    end
end

function collatz_path(n)
    steps = Vector{Int}()
    while n != 1
        push!(steps, n)
        n = collatz_next(n)
    end
    push!(steps, 1)
    return steps
end
In the function I kinda build on top of the fact that it always reaches 1 but as it's the fact for numbers up to \(2^{68}\) I think it should be enough for our use case 😉
Let's plot some data for the first \(10,000\) numbers
using Plots

x = 1:10000
y = length.(collatz_path.(x))
scatter(x, y, label="Stopping time", legend=:topleft, size=(800,600))

x = 2 .^ (0:13)
y = length.(collatz_path.(x))
scatter!(x, y, color=:red, label="for powers of two")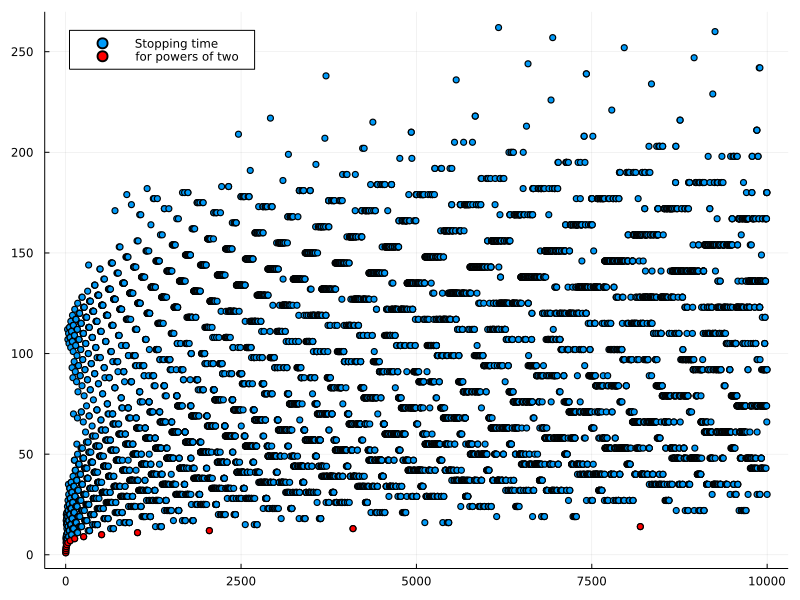
Or maybe a histogram of the number of steps?
using Plots

x = 1:10000
y = length.(collatz_path.(x))
histogram(y, label="Number of steps", size=(800,600))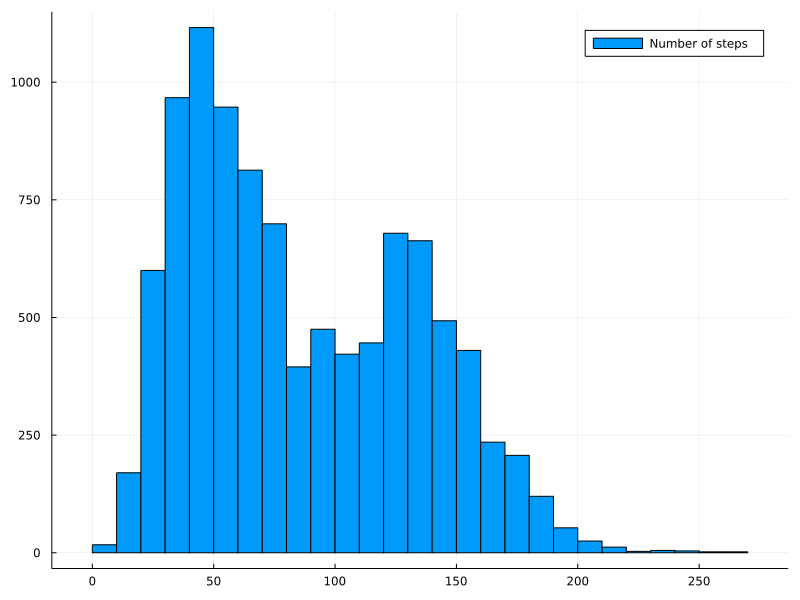
Animation
Okay well we're actually here for some animations, right?
Starting again with the basics:
using Animations
using ColorSchemes
using Javis

function ground(video, args...)
    background("black")
    sethue("white")
    translate(-video.width/4, video.height/2-10)
end

function main()
    vid = Video(1920, 1080)
    nframes = 100
    Background(1:nframes, ground)

    render(vid; pathname=joinpath(@__DIR__, "../../_assets/blog/2021-09-12-javis.jl-examples-series-collatz-conjecture/images/collatz_1.png"))
end
Actually I used translate in the ground function here to start nearly at the bottom of the canvas and more to the left. You'll see why later.
First of all: The idea of the drawing was developed by Edmund Harris and this is just one of many implementations. Full credit to him 😉
The paths of all the number sequences can be combined in a tree. For example:
collatz_path(127)
# "127,382,191,574,287,862,431,1294,647,1942,971,2914,1457,4372,2186,1093,3280,1640,820,410,205,616,308,154,77,232,116,58,29,88,44,22,11,34,17,52,26,13,40,20,10,5,16,8,4,2,1"

join(collatz_path(3448), ",")
# "3448,1724,862,431,1294,647,1942,971,2914,1457,4372,2186,1093,3280,1640,820,410,205,616,308,154,77,232,116,58,29,88,44,22,11,34,17,52,26,13,40,20,10,5,16,8,4,2,1"
Here both have the same sequence after 862. So we could save all sequences in a big tree structure where a node represents a number and is connected to the parent to the number it results in when applying collatz_next once and the children are are the numbers it could have come from.
Detour creation of a tree
Sorry for the small detour. Before we continue with the animation let's have a look at a more standard and not so visually appealing representation of the tree.
This time you can just read through the code here.
It basically creates the tree starting from the root 1 and either multiplies it by 2 or subtract 1 and divide by 3 (under certain conditions). Then I used GraphMakie to plot the tree and did some stuff to make the edges longer (multiplying the y part of the layouted point by some number) and aligned the labels a bit.

Well now you know the traditional tree structure 😉
Algae
Our goal now is to make this a bit more visually appealing. We want to draw the root node at the bottom and depending on whether we came from the division by 2 step or the multiply by 3 and add one step we either go a bit in the clockwise or a bit in the counter clockwise direction.
More precisely let's have a look at 10 in our tree above. We could have come either from 20 or from 3 to reach 10. We would have a point for 10 then from there move a bit into one direction and clockwise to 20, i.e to 9o'clock (left) and clockwise to 10o'clock. Then for the 3 we would go to 9o'clock (left) but a step counter clockwise to 8o'clock.
The interesting part is now that at 20 and 3 we would have another one of this clock which are not with 12o'clock point directly upwards though. Rather into the direction of 10o'clock or 8o'clock from the previous number 10.
It's a bit similar to inverse kinematics where the previous angles of a segment determine the overall direction of the current angle.
I'm struggling with explaining the concept I guess so let me draw something.
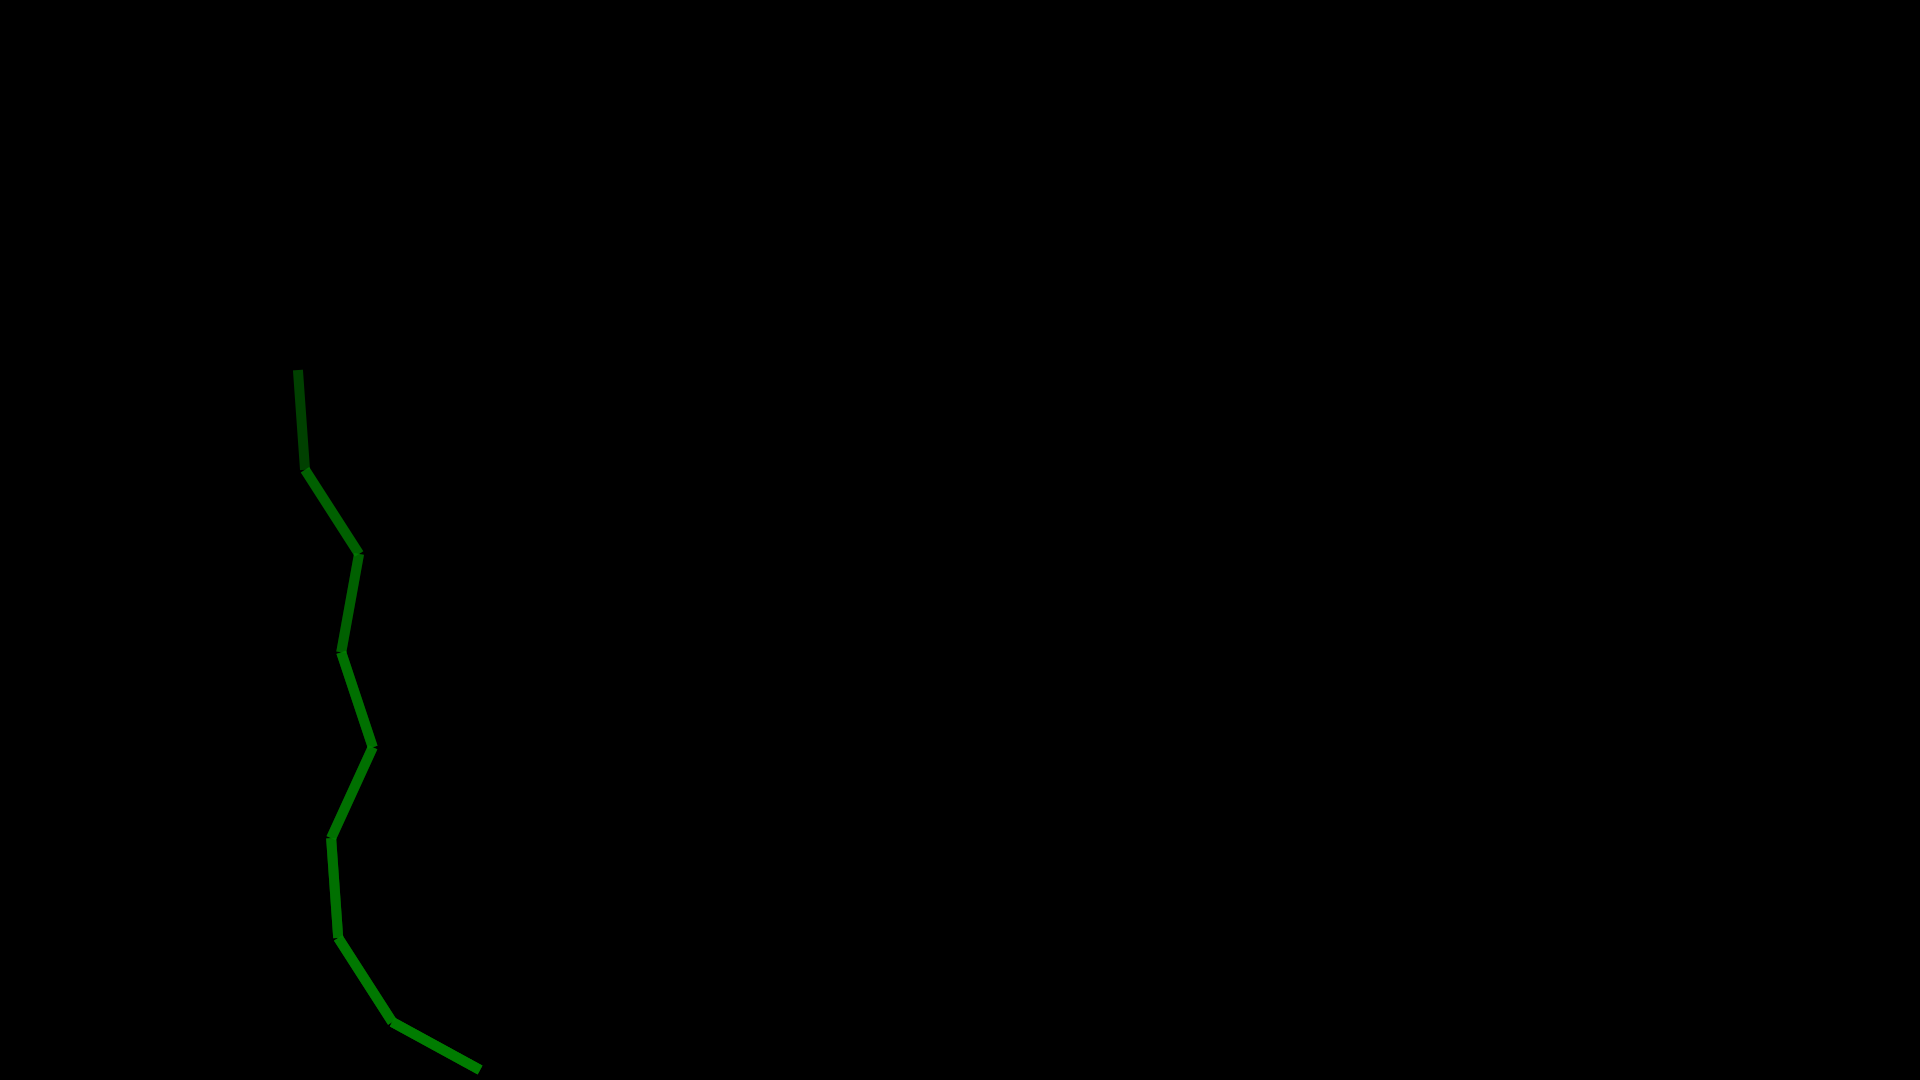
At the very bottom you have 1 then from there it goes a bit left and clockwise to 2 now to 4 is already going more up then left to 8 it's mostly up and for 16 it already goes right.
Let me get into the code for this now. It's mostly doing
rotate
which rotates the canvas in such a way that we don't have to compute the addition of angles ourselves.
function draw_collatz_path(ns, len, angle, angle_factor, opacity, linewidth)
    @JShape begin
        setopacity(opacity)
        setline(linewidth)
        sethue("green")
        for n in ns
            @layer begin
                path = collatz_path(n)
                for j in length(path)-1:-1:1
                    angle_even = angle
                    angle_odd = angle_even*angle_factor

                    if path[j] % 2 == 0
                        rotate(angle_even)
                    else
                        rotate(angle_odd)
                    end
                    line(O, Point(-len, 0), :stroke)
                    translate(Point(-len, 0))
                end
            end
        end
    end ns=ns len=len angle=angle angle_factor=angle_factor
end
That might look a bit complex at the beginning but it isn't actually. Let's walk through it step by step. Maybe I'll start with explaining all the arguments:
- `ns` the starting numbers we want to draw (in the above example `1:6`)
- `len` the length of each segment
- `angle` the angle of a clockwise turn (meaning when divide by 2)
- `angle_factor` the factor the even angle is multiplied by for an `odd` turn.
    - we could use `-1` for this but it's more beautiful with a slight increased absolute angle.
- `opacity` the opacity of each segment
- `linewidth` the line width of each segment
It would probably be helpful to have them as keyword arguments but you can refactor that yourself 😉
Then we use
@JShape
as described in previous posts. Set our general settings of opacity and linewidth I've also set the color here, which we'll later change a bit for a more beautiful animation.
Then we loop over all the numbers we want to visualize and create a
@layer
for each as we rotate and translate the canvas which should only have an effect on the current number.
Afterwards we get the collatz path and move along it in the reversed direction starting with the number 2 (as we always come from 2 to 1) Then we check whether the number is even or odd and rotate the canvas accordingly. We draw a line to the left in the rotated angle and translate to that new position.
That's basically it. 🎉
A bit of a harder part I struggled with was to find reasonable angles and length of the segment to create a stunning algae I had seen before.
However for this it's kind of reasonable to just animate between the different values and then pick one you like.
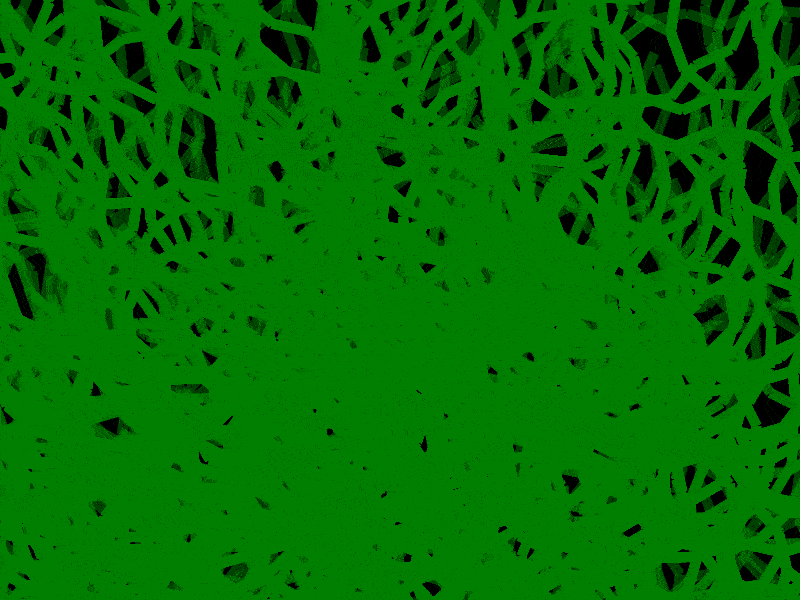
This is with the following code before
render
:
ns = 1:10000

collatz_tree = Object(1:nframes, draw_collatz_path_simple(ns, 40, 0.5, -1.5, 0.5, 10))

act!(collatz_tree, Action(1:nframes, change(:angle, 0.5 => 0.1)))
You can see that I choose -1.5 as the multiplier here. And the angle starts at 0.5 and goes to 0.1. Based on the animation we can see that closer to 0.1 looks more like a tree structure and the length of the segment is way too long.

Going only from 0.2 to 0.1 with the angle looks much better (actually the one before looks also interesting but not what I had envisioned). Additionally I decreased the length of each segment to 3.1.
Now it's time for you to play around a bit with changing the colors and the width of each segment yourself.
This is one of the best that I came up with:

I hope you enjoyed the visualizations and are inspired to play around with it yourself. Let me know what you are able to create with it on Twitter @opensourcesblog.
And don't forget to sign up for the email newsletter 😉
Thanks to my 12 patrons!
Special special thanks to my >4$ patrons. The ones I thought couldn't be found 😄
Anonymous
Kangpyo
Gurvesh Sanghera
Szymon Bęczkowski
Colin Phillips
Jérémie Knuesel
For a donation of a single dollar per month you get early access to these posts. Your support will increase the time I can spend on working on this blog.
There is also a special tier if you want to get some help for your own project. You can checkout my mentoring post if you're interested in that and feel free to write me an E-mail if you have questions: o.kroeger <at> opensourc.es
I'll keep you updated on Twitter opensourcesblog.
